請輸入想查詢的單字或片語
flexion
US /ˈflɛkʃən/
・UK /ˈflekʃn/
A1 初級
n.名詞彎曲 ; 彎曲部分 ; 語形變化
影片字幕
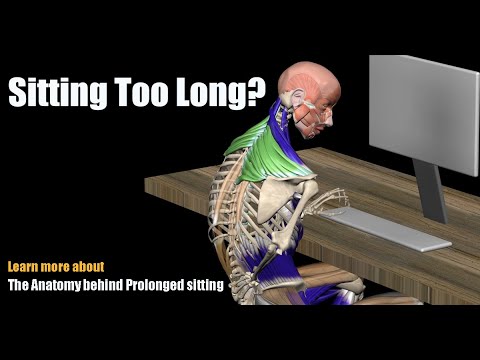
久坐導致疼痛嗎?原來久坐造成的問題是這樣來的! (Pain from Sitting Too Long? The Anatomy behind Prolonged sitting)
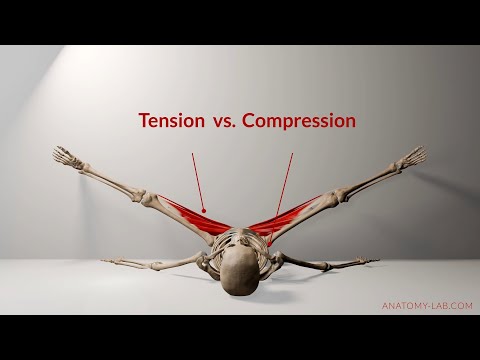
- Here, we can see a neutral spine and lumbar flexion.
在這裡,我們可以看到一個中立的脊椎和腰椎屈曲。
第 5 章 - 神經、肌肉和骨骼系統 (Chapter 5 - The Nervous, Muscular, and Skeletal Systems)
- You'll see here, rolling is the example that you would see right at the top of your, that would be your elbow, going into some either flexion or extension, depending upon which way it's moving.
你會看到這裡,滾動就是一個例子,你會看到在你的肘部頂端,你的肘部會進入屈曲或伸展狀態,這取決於肘部移動的方向。
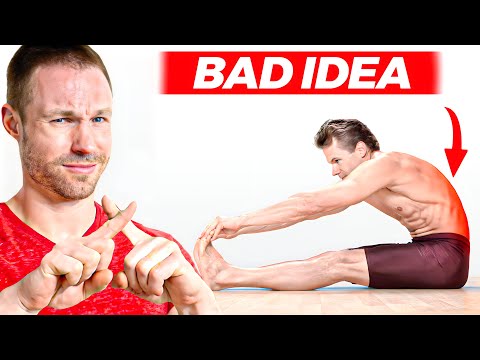
如何解決背部疼痛(7 個科學步驟) (How To Fix Back Pain (7 Science Backed Steps))
- To start, if your pain is worse when sitting slouched and pulling up on the underside of a chair, or with bending movements and lifts like picking up objects from the ground, or especially deadlifting, your pain can be categorized as a flexion intolerance, often due to a disc bulge or herniation.
首先,如果你在懶散地坐著和拉椅子底部時疼痛加劇,或者在做彎腰動作和舉起地上的物品等動作時疼痛加劇,尤其是在舉重時,那麼你的疼痛可以歸類為屈曲不耐受,通常是由於椎間盤突出或椎間盤突出症引起的。
- If this sounds familiar, you need to learn how to avoid spine flexion when sitting by using some support for your low back and with bending tasks by hinging about your hips.
如果這聽起來很熟悉,那麼你就需要學習如何在坐著時避免脊柱彎曲,方法是在腰部使用一些支撐物,以及在彎腰時通過臀部彎曲來避免脊柱彎曲。
每日十分鐘活動套路【全身釋放 (The Daily 10 Minute Mobility Routine [FULL BODY RELEASE])
![每日十分鐘活動套路【全身釋放 (The Daily 10 Minute Mobility Routine [FULL BODY RELEASE])](https://img.youtube.com/vi/dBYjU7iBpck/hqdefault.jpg)
- Now, I'm in a pure abducted motion, out to the side, all the way up into flexion.
現在,我在做一個純粹的外展運動,向一側外展,一直到屈曲。
停止做這些治療腰痛的運動 (STOP Doing These Exercises For Low Back Pain!)
- And for a lot of people, especially if you have an irritated disc, you're pulling into a lot of spinal flexion and just irritating something that's already very sensitized.
對很多人來說,尤其是椎間盤受刺激的人,脊柱彎曲的幅度很大,會刺激到已經非常敏感的部位。
- Now, nice and neutral, now I want you to pull your chin down as you go into flexion a little bit.
現在,保持良好的中立姿勢,我要你把下巴向下拉,同時稍微彎曲。
你需要的最後一段深蹲視頻 (The Last Split Squat Video You'll Ever Need)
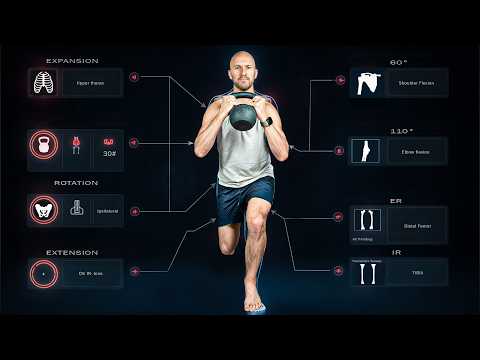
- And that's because external rotation occurs both in the early ranges of hip flexion and deep, as well as terminal hip extension.
這是因為外旋既發生在髖關節屈曲和深屈的早期範圍,也發生在髖關節伸展的末期。
- Just make sure to keep the arm at about 60 degrees of shoulder flexion.
只要確保手臂保持肩關節屈曲約 60 度即可。
如何在樹上滑雪 (How to Snowboard in Trees)
- The movement pattern I use with flexion and extension is, again, very similar to what I'm doing in the bumps.
我在屈伸時使用的動作模式,同樣與我在顛簸中的動作非常相似。
第 16 章 - 核心訓練理念 (Chapter 16 - Core Training Concepts)
- And so because of that, what it allows for is that lateral flexion of the spine, meaning if you were to stand up straight and bend directly to your left or to your right, all right, that will be lateral flexion and then elevation of the pelvis because of how it connects in an upward fashion, okay?
正因為如此,它允許脊柱側屈,也就是說,如果你站直了,直接向左或向右彎曲,好的,這將是側屈,然後骨盆抬高,因為它是以向上的方式連接的,好嗎?
- There's those primary actions, trunk and spine flexion, rotation and lateral flexion.
主要動作有:軀幹和脊柱彎曲、旋轉和側屈。
簡單有效的 2 天初學者力量訓練計劃 | Mike Israetel 和 Peter Attia (Simple and effective 2-day strength training program for beginners | Mike Israetel and Peter Attia)
- Things like pull-ups, pull-downs, barbell and dumbbell bent over rows that, for the back at least, engage the forearm flexion muscles, the biceps, etc.
比如引體向上、下拉、槓鈴和啞鈴彎舉,至少對背部來說,可以鍛鍊前臂屈肌和二頭肌等。