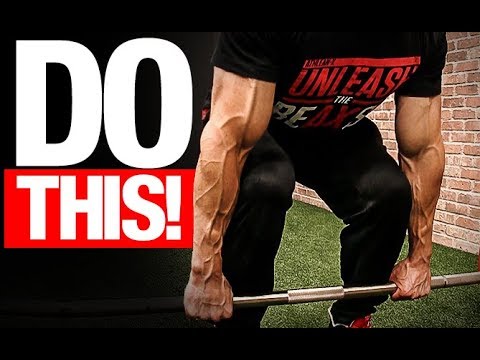
Placeholder Image

字幕列表 影片播放

  • What's up, guys?

  • Jeff Cavaliere, ATHLEANX.com.

  • We're talking deadlift today.

  • One of the best exercises you can do if you do it right.

  • So we're breaking out the checklist so we can break this down step by step and make

  • sure that you do.

  • Okay, any good deadlift starts with how you prepare your body to do it before you even

  • do the exercise.

  • So a couple things that I do: there's two considerations here.

  • Number one: you've got to have the feeling that you could actually get to this bar and

  • do this exercise properly.

  • So what I do is a quick, little routine to feel nice, and loose.

  • I put my feet up, against the insides of the plates, and I use them to stretch out my adductors

  • in my groin because we know if you're going to be driving your knees outas you should

  • be, as you'll see when you press this bar off the ground, and pull it off the ground

  • – I say 'press'.

  • That's the key difference, too.

  • You're going to want to make sure that you have adequate flexibility here through your

  • adductors.

  • The next thing I do is, I feel as if I want to keep my hamstrings engaged, and I also

  • want to have my pelvis in the right position.

  • So I lean forward where to grab the bar, and I try to get myself into an anterior pelvic

  • tilt.

  • So I'm trying to rotate my pelvis all the way down until it's facing the ground.

  • All the way down.

  • Point your junk down to the ground, keep your hands on the bar, and then keep your head

  • up.

  • Look straight ahead and just feel the stretch in your hamstrings, and feel the stretch here

  • in all those attachments to your pelvis that we know we feel like we're in that good position.

  • Once I do thatjust for a couple minutes until I feel nice, and loosethe next

  • thing I'll do is this pre-deadlift movement pattern.

  • That is, I stand here, I keep my hands on my thighsyou're going to see why this

  • is very important in a secondand I let them slide down until the level of the knees,

  • by doing nothing but hip hinging.

  • If you just did what I showed you that hip hinge should feel really easy now.

  • So right down to here, no bending the knees.

  • From here, once I get to the level of the knees, then maintaining this low back, I just

  • let my hands drop straight down by bending nothing but the knees.

  • Then I work on going back up and feeling the first few inches of this to be nothing but

  • let press as I get to the level of the knees, and then driving through with nothing but

  • the hips.

  • So it's hip hinge to the level of the knees, drop the knees down, push through the knees,

  • hip hinge, and finish it all the way here, through extension.

  • Just use that movement pattern until you feel as if you've got it down, and then you're

  • ready to start lifting the bar.

  • Now we're ready to actually approach the bar.

  • There is something you want to focus on here.

  • There are actually two things you want to focus on.

  • First of all, how far under the bar are your feet going to go?

  • And how far apart should your feet be?

  • First of all, let's deal with the easy one.

  • The width of your feet should be the width of your hips.

  • Now, for someone that doesn't have a really wide physique like me, that could be pretty

  • narrow.

  • You see mine.

  • I'm actually inside the non-knurled areas of the bar, here.

  • For you, that could be a little bit wider, but it doesn't matter.

  • You just want to be hip width.

  • As far as 'how far under the bar the feet should actually go', there's a little cue

  • I like to use here.

  • I want to just see my laces on the other side of the bar.

  • So you can see right now I can't.

  • My laces are actually being covered by the bar.

  • If I sneak them out, just to the other side here, now I've actually setup the right position

  • for this bar.

  • Which should be about 1" away from my shin because when I go down to the bar my shins

  • will go forward to meet that bar, and that is the proper position.

  • Now, a lot of people will try to roll the bar away, and then roll it back.

  • That's sort of a pre-lift ritual, but ultimately what they're doing is they're getting that

  • bar back to that position, and they're using the experience that they have, and being comfortable

  • with moving the bar to get it there, ultimately, in the right position.

  • If you're new and you're just learning this exercise; take one of those variables out.

  • Get set to the bar and don't change anything else.

  • Get yourself about 1" away, get ready to perform the lift, and just go ahead and do it.

  • Okay now, with the feet in the proper place, now we've got to get the hands in the proper

  • placement.

  • There are two elements I want to cover here.

  • It is the type of grip that we're going to usebecause we've probably seen a lot

  • of different grips being used on this exerciseas well as the width of your hands on

  • the bar when you perform the lift.

  • So first of all, let's talk about the type.

  • You have three different options here when it comes to how you're gripping the bar.

  • Most commonly, you probably see this 'double overhand grip'.

  • There's a great advantage to this that we're going to get into when we actually talk about

  • performing the lift, but at the surface level here, this is giving you the most balanced

  • distribution of your upper body, and how you're gripping the bar so you don't create muscle

  • imbalances by gripping the bar.

  • The second option that you'll see is often the choice when you feel as if this is too

  • weak of a grip, because the bar starts to roll out of your hands.

  • So what do we do?

  • We see people do a mixed grip.

  • The mixed grip is one under, one over.

  • The one under and one over allows the bar to stop rotating, because as it starts to

  • fall out of this hand, it's actually turning more into this hand.

  • So you're creating more stability.

  • It's the same way you would grab a baseball bat.

  • Your dominant hand would be on the top here, and the underhand, you just take that baseball

  • bat, and turn it.

  • That's what you're doing here, on the bar.

  • However, in order to eliminate some of the muscular imbalances that could be created

  • from doing thisespecially up in your shoulder girdleyou would want to alternate

  • the grips here.

  • So you have a third option.

  • This is the option chosen by more of the advanced lifters that perform this lift.

  • That would be a hook grip where you take your thumb, you wrap it around, and then you wrap

  • your fingers over your thumb.

  • So if you look at it here, they wrap their fingers around that thumb.

  • Now I'm going to tell you, if you're going to do this, number one: it's going to be very

  • uncomfortable.

  • It's going to feel like you're snapping your thumb off.

  • But in order to alleviate that you want to grip on that first digit here.

  • That first knuckle right here.

  • If you go on top here you're really going to feel like you're snapping your thumb off.

  • Okay, from here I still would adviseif you're going to do this, you're going to want

  • to build up to this by starting with lighter weights, accommodating to this discomfort

  • that you might feel on this the first time you do it, and then over time, of course,

  • your body is going to become resilient to it.

  • It will be, overall, your most effective grip, your strongest grip, and it will also not

  • lead to those imbalances that the mixed grip would.

  • Now as far as the width, and how wide I want my hands on the bar, that actually brings

  • up a point from the last topic.

  • That is, a lot of people think that the mixed grip is what is responsible for leading to

  • bicep tears during the deadlift.

  • A lot of people are scared about tearing a bicep during a deadlift.

  • More so, it actually comes from what you're doing with your arms, in terms of width, and

  • I'll show you why.

  • First of all, people sometimes want to grab the bar wide.

  • But what you're doing when you grab wide is, you're effectively shortening the length of

  • your arms.

  • If we know thatif I let my arms hang straight down, right about the width of my

  • hips, or just down at the sidethey're as long as right here.

  • To this point in my thigh.

  • But if I widen them you can see that they lift up, and I've just shortened them by about

  • 2", or 3".

  • So the shorter my arms becomebecause I widen them out on the barthe lower,

  • and deeper I'm going to have to become on every, single rep of the lift.

  • And I'm not necessarily concerned about that from the strength benefits, because that would

  • be a good thing.

  • I'm more concerned about the fact that most of us don't have the mobility to go those

  • extra 2", or 3" down.

  • So you're causing yourself and increased likelihood that you're going to screw the lift up by

  • going wider.

  • So the ideal position here is to have your hands just outside of those hip width feet.

  • So just to the outside by about 1".

  • Now you want to have enough room here for two reason.

  • Number one: you don't want to have your hands dragging up the sides of your thighs,

  • here.

  • You want the bar dragging up your thighs, but you don't want your hands dragging up

  • because the extra friction can make the exercise: A) more uncomfortable than in could be, and

  • B) just become a little more awkward.

  • But more importantly, the tendency, as I said, is when you start to push you're going to

  • want to have your legs pushing out.

  • If your arms are too close, what happens is, people will create an inadvertent elbow bend

  • here, as they perform the lift.

  • No matter if you're doing it this way, or you're doing it this way with a mixed grip

  • you might get some flexion here of the elbow as you perform the lift, which places a high

  • degree of unnecessary tension on the bicep.

  • That is what, more often, leads to the ruptures of what you see happening in the biceps.

  • The same thing would apply if I were to go do a dead hang on a pullup bar.

  • I could hold there for a very long period of time, but if you wanted me to do a flex-arm

  • hang that time would be cut drastically.

  • So we can actually become more efficient by just letting the arms hang straight down,

  • keep the tension all the way through here.

  • Even though it's more elongated it's less likely to tear in this position because it's

  • a more stable position.

  • Okay, we've got the feet in place, we've got the hands in place, and now we've got to get

  • our body in place.

  • If you've followed what I've said to this point, as you lower yourself to the ground,

  • if your feet are the proper distance away from the bar your shins will make contact

  • with that bar.

  • Now your grip, as you saidwe've talked aboutand from here the only goal you

  • should have is to get your low back in the right position to execute this lift because

  • when people talk about the dangers of this lift it's because they're doing it with the

  • wrong positioning of the low back, which can cause a lumbar disc issue if you don't do

  • it right.

  • So from here you only have two cues.

  • You've got to drive your chest forward, up, and out, and you want to drive your hips down.

  • So from here the chest goes out, hips go down.

  • What you'll also find is that your arms will get the lats activating to actually pull you

  • into that position.

  • Think about doing a straight-arm push down.

  • You're literally doing that straight-arm pushdown, which will bring the bar further in contact

  • with your shins, chest goes out, hips go down, and I'm ready to rock and roll.

  • Now the key, as I've said, the position of the low back being flat.

  • You don't want that rounded low back.

  • Don't worry about how angled your torso is to the ground.

  • As long as the low back is in the right position.

  • You may see people that are really far bent over like this, here, or people that are more

  • upright.

  • That's a factor of their leg length and torso length; whatever is right for you.

  • As long as your low back is there, then you know you're in the right spot.

  • So now, when we get ready to actually pull, guysthis is why I call this a leg exercise'.

  • And it had better be a leg exercise first if you want to avoid all the problems with

  • your low back that you could potentially run into with this exercise.

  • It has to start with a push of your legs off the ground until your hands are at the level

  • of the knee.

  • So if you go back to that warmup that I was showing you, grooving that pattern; that's

  • exactly what you're trying to do.

  • I'm going to show you why, here.

  • I'm going to break this down into, literally, two parts.

  • From the ground to the knee, and then from the knee, up.

  • So now when we get in this position here, what you want to doonce that chest is

  • out, and those arms are engaged, and the low back is downwhat you're trying to do

  • here is do a standing leg press.

  • I'll show you exactly why this is exactly a leg exercise.

  • You're going 'standing leg press' from here, to here.

  • Here, to here.

  • Right from your hands, from there, from the floor, to the knee.

  • Once they get to the knee, that's when the hips will start to kick in.

  • Then this will become a tremendous back exercise.

  • But from here, to here you're doing all the initiation with a push of your legs, into

  • the ground, as hard as you possibly can.

  • I talk about, all the time, why this is a standing leg press because the mechanics are

  • the exact same.

  • If my hands were down here on the handles, and my feet were on the plate, and I push

  • away; all that is happening right there, from the legs.

  • I do not bring my body closer to my thighs in order to feel like I'm pushing.

  • I take my feet and I push them away.

  • So the same thing would apply here.

  • You're not going to bring your body closer to your thighs here because what that does

  • is, it lifts with the hips.

  • The first move is hip.

  • The first move is hip.

  • Lifting with the hips throws your low back into a rounded position.

  • Which, again, is asking, and begging for a lumbar disc issue.

  • This is an incredibly safe exercise.

  • One of the best exercises you can do, but you have to get this part right.

  • So again, when we're in here the position is down, chest out, hands in, here, we're

  • going to do a leg press, straight to here.

  • Down.

  • Leg press, straight to here.

  • I'm going to show you what happens to the bar once it reaches that level of the knees.

  • So now, if we can get that bar to the knees we want to make sure that it's dragging up

  • those shins every inch of the way, staying in contact.

  • If you start to see space between the bar and you it's likely that you're not doing

  • what I said before, which is keeping that lat engaged.

  • Keeping that straight-arm pushdown going to keep the bar close.

  • It's going to keep your whole upper torso tight, and stable also.

  • So now when it gets to the level of the knees right here, by using just the legs to power

  • it up, now we let the whole rest of the back kick in.

  • Now it becomes an incredible back exercise, and a posterior chain exercise as we drive

  • through, using the strong muscles of the hips, and our low back extensors, and our traps

  • to stabilize the bar.

  • So we're going from here, and driving through.

  • You'll notice if you do this right the timing is simple because you're using your knees

  • as the visual cue of when to kick this in.

  • As soon as your hands are at the level of the knees, boom!

  • The hips kick in and the bar will continue to travel up, in that efficient, straight

  • path.

  • So right against your shins, and right against your thighs.

  • That should be the goal on every, single rep.

  • So it looks like this.

  • From here, down, set up, to here, drive through with the hips.

  • Here, engaged, drive through with the hips.

  • Now, on the way down you want to reverse the motion.

  • Hip hinge, hip hinge, hip hinge.

  • Right to the level of the knee, straight knee bend.

  • Very simple.

  • So we're up here, down, and then on the way down hip hinge, hip hinge, hip hinge to the

  • level of the knee, then let the knees bend, come straight down.

  • You'll see that the back stays right in the position you need it to be.

  • Guys, this lift has a lot of components to it, but when you put them all together it's

  • actually very, very simple.

  • It should become a staple of your training for many, many reasons.

  • Most of which, it's one of the best total body exercises.

  • Yes, you're training the legs.

  • Most importantly, if you're training legs because it sets up the safety of the entire

  • rest of the lift.

  • And of course, a posterior chain.

  • Overall, awesome exercise.

  • There's none better than this.

  • Guys, it's not the exercise.

  • You can tell people "I'm deadlifting."

  • And you think you're doing things right.

  • It's doing the exercise right that matters the most.

  • Actually, in this case doing the exercise wrong could actually lead to an injury that

  • will keep you way from the gym for a long, long time.

  • I don't want to see that happen to you.

  • I want to make sure you get these all right.

  • I hope you've found this checklist exhaustive, but very, very helpful.

  • If you want me to cover more of them I'm happy to do that in future videos.

  • Just leave your comments down below and let me know.

  • In the meantime, if you're looking for a program that caresnot just what exercises we

  • do, but more importantly how we do themhead to ATHLEANX.com.

  • Use our program selector, using the link below this video to find a program of mine that

  • is best suited to your current goals.

  • All right, guys.

  • I'll be back here again for a future video.

  • See you.

What's up, guys?

字幕與單字

單字即點即查 點擊單字可以查詢單字解釋

B1 中級 美國腔

官方仰臥起坐檢查表(避免錯誤!)。 (The Official Deadlift Checklist (AVOID MISTAKES!))

  • 31 4
    江德榮 發佈於 2021 年 01 月 14 日
影片單字