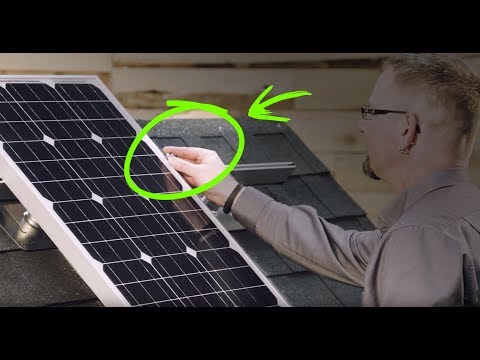
Placeholder Image

字幕列表 影片播放

  • Hello, solar folks!

  • My name is Jeremy Allen, solar design tech here at Wholesale Solar.

  • Today we're here to discuss one of the most important parts of your solar array, the solar

  • racking system.

  • We're gonna go over the installation of the IronRidge XR100 racking system on an asphalt

  • composition roof using the FlashFoot 2 flashings.

  • There are many other types of roof this is the most common, but if you have a tile or

  • metal roof don't be afraid, we do have a solution for you.

  • We choose to work with the IronRidge racking system because of its ease of installation,

  • code compliancy, and included state-stamped engineering that will include your wind and

  • snow load requirements specific to your state.

  • Before we jump on the roof, be sure to have all of your tools prepared, your parts laid

  • out, and the engineering report that we've provided you with so that you know how to

  • lay out the panels on the rooftop.

  • I do wanna make sure each one of you is being safe up there.

  • You can get a fall protection kit from your local hardware store or roofing supply store

  • to make sure you're extra safe.

  • With that said, let's get started.

  • One of the pieces of information that is not included on your engineering report is the

  • distance between the rails up on the roof.

  • That's gonna be dictated by the holes that are pre-drilled on your specific panel.

  • In this case, we've got a solar panel here, about 100 watts, its holes are gonna be 35

  • and a half inches apart.

  • That means the rails on the roof are gonna be 35 and a half inches apart.

  • To get started, we need to find out where our rafter or truss is within this rooftop.

  • Now, keep in mind some local Authority Having Jurisdiction or your local building department,

  • may require you to have full three feet or more from the edge of the roof.

  • In our case, we don't have that much roof, so we're gonna go right up to the edge of

  • it.

  • Where we're gonna wanna start out is finding nails if we can in the facia, or on that nice

  • pretty board that goes along the bottom of your rooftop.

  • In this case we can see a couple nails and we know generally that that truss is gonna

  • be located somewhere in this area.

  • We don't need to know that exact space yet, because we're gonna drill a spot hole through

  • the roof and into the attic so we can measure exactly where that is.

  • The other figure we wanna keep in mind is the 35 and a half inches that we discussed

  • earlier, in this case we'll see, doesn't line up exactly with the center of our shingles,

  • which we'd really like to.

  • And as long as we're within two to three inches of those pre-drilled mounting holes on the

  • back of the solar panel, we're okay.

  • So we're gonna know, we're gonna go in the center of this shingle length right here,

  • and the center of this shingle length right here.

  • So first thing we're gonna wanna do, we're gonna wanna get our drill and we're gonna

  • wanna drill right close to this to see how close we actually are to that rafter.

  • Alright, so the first thing we're gonna do is we're gonna put a pilot hole in here.

  • And again, we found our truss location somewhere in here and we know we've gotta be somewhat

  • centered on this course of shingles so we're gonna go ahead and put a hole right here and

  • see where we come out in the attic.

  • Now we can leave the drill bit in place so that we can go into the attic and find out

  • where we are in comparison to that truss.

  • At this point we're gonna come into the attic space and measure from the center of our drill

  • bit to the edge of our truss to find out exactly how far we have to move over.

  • And we see we've got about one and five eighths inches.

  • We've gotta another three quarters of an inch to that to be sure we're centered inside of

  • the truss.

  • So let's go ahead and go back up on the roof and make that happen.

  • Alright so we know we're an inch and five eighths from the center of this drill bit

  • to the edge of the truss here so we're actually gonna mark out that exact measurement.

  • And know we've got the edge of our truss.

  • Now, from there because all of our standard lumber is gonna be about an inch and a half,

  • we wanna measure three quarters of an inch from that point to the center of what's now

  • gonna be our new hole.

  • Now you're asking, "You've got a hole in your roof!

  • What are you gonna do about that!?"

  • We actually will just use a standard sealant, something like Henry's or whatever your roof

  • specific manufacturer requires and put it into this hole to make sure it stays water

  • tight and essentially, that flashing is gonna go over that hole to make sure it stays weather-proof

  • and water tight anyway.

  • So from this step, we'll go ahead and remove our drill bit.

  • So now that we have our center mark here, we're gonna make another center mark for the

  • next one up, again 35 and a half inches from the bottom hole.

  • So we're gonna go ahead and measure, in this case we know we've got a good square structure,

  • may not always be that way, so there may be a couple trips into the attic to spot holes

  • to be sure you're hitting the center of your truss.

  • But in this case, we'll go ahead and move along and we'll find out we're about 27 and

  • three eighths of an inch from the edge of the roof.

  • Now I'm gonna take that same measurement up to this course of shingles we're gonna go

  • 27 and three eighths inches up here and know we've got a line now that we can take with

  • our chalk and make a good visible line for future holes that we're gonna be drilling.

  • Now if you have multiple panels high or multiple panels wide, you'll just do this that many

  • more times to be sure you have all the holes lined up before you actually start drilling.

  • So we've got a good chalk block and we're actually gonna get in here, we're gonna chalk

  • out a line on here so everyone can see exactly where we're gonna be drilling.

  • And pretty simple now from here, again, as long as the framing's standard, you should

  • have about a 24 inch center-to-center line.

  • Your truss is typically your 24 inches from each other, but again, that's not gonna always

  • be the case so you'll wanna double check.

  • We're gonna go ahead and pull the tape measurer 24 inches over and know that should be the

  • next truss.

  • So now we have our two trusses marked out where we're actually gonna be drilling into

  • the roof.

  • The other thing that we need to do is actually get that line lined up here where our rails

  • are actually going to be sitting.

  • So we're gonna take a measurement from the bottom of the roof to the center of this or

  • if you really trust your roofer and know that they made straight lines to begin with, a

  • lot of times you can follow their course of shingles and know you should be really close.

  • So if we did that right, we'll know these'll be our first few real holes that will hold

  • the flashings in place.

  • So we're gonna go ahead and drill in.

  • Now that we have all of our holes drilled, we're gonna get up underneath each course

  • of shingles to make sure that our flashing has a good place to slide up and seat itself.

  • So we're gonna take our flat bar and we're gonna slide it up under here and look for

  • any resistance where there might be actually nails popping up and we're going to try and

  • remove them.

  • Sometimes you're gonna get lucky, which, in this case it looks like we may have with this

  • flashing, where there's not gonna be any nails that would obstruct that flashing.

  • Other places, you might find out there's gonna be a couple nails and you're gonna have to

  • remove those and possibly replace them if need be to keep those shingles in place.

  • Before we put the flashing in place, we are gonna put the appropriate sealant in the holes

  • to make sure our roof remains water tight.

  • In this case, we've got some good old Henry's, we're gonna fill that hole up completely,

  • knowing that the flashing's still gonna cover this hole and keep it even further weather

  • tight.

  • Get a good amount in there, make sure it's good coverage, and if you need to, go through

  • on the other side into the attic to make sure that did fill that hole completely.

  • Now we're gonna go ahead and put our flashing in place, lag it down into the hole that we

  • drilled already, and go from there.

  • We're gonna slide this flashing up under that course of shingles, knowing we don't have

  • any nails up there.

  • These center lines, there's actually little punches in the flashing to line you up.

  • If you've got a chalk line going the length of your roof, which you will in longer solar

  • arrays, you can line up these little notches right with those chalk lines and it'll center

  • you right to where that hole should be.

  • Now in this case, we know we're close to that hole and we're gonna go ahead and start threading

  • our bolt in place make sure that we don't have anything in that hole.

  • You can use an air compressor to clean out the hole if you need to.

  • And then, just a basic ratchet and we're gonna tighten that guy up until it starts to seat

  • all the way to the roof.

  • Now, we don't wanna over-tighten to where it's concaving that flashing, you can actually

  • cause issues in doing so.

  • And again, we don't wanna get too tight we just wanna seat firmly against the rooftop.

  • And you'll feel it.

  • I don't recommend doing this with a power tool because you will over-tighten them and

  • you can ruin the flashings or break the bolt just from the excess heat going into the truss.

  • And so we're fully seated there, we actually have a cap that's now gonna go on the top

  • of this that's gonna connect it to the rail that we're putting in place.

  • This is the proprietary piece that IronRidge has come up with to make their flashings this

  • easy to install.

  • As you see, the bolt is raised off of the roof surface so that if water does come through

  • here, even without this cap being on there there's no way of that water actually getting

  • down into the rooftop.

  • So we take this piece here, and it's gonna go in place and it can have two different

  • locations: it's either gonna be up and down that like that, which we actually don't want

  • that, we want to go back one quarter of a turn and lock it so that the rail will sit

  • right across it like this.

  • Alright, our last little guy here and we're ready to move onto the rail install.

  • Alright, so the next portion of this installation is gonna be the actual rails being attached

  • to these flashings.

  • Each setup's gonna have some different amounts of hardware that we're gonna have to look

  • at before we put the rail in place.

  • In this case, we've got it simple, because we only have two attachments from the rail

  • to the flashings.

  • And we're gonna use the supplied hardware that's actually gonna be a square on one end

  • and a regular nut on the other end.

  • That square end's gonna slide down the rail channel all the way to the one side, we'll

  • get both of those in there, so we have them in place.

  • And we can even line them up, close to where the flashings are if you've got the rails

  • sitting on the rooftop like this.

  • In a lot of cases, I am gonna suggest to get that rail ready ahead of time down on the

  • ground if possible.

  • In this case, we'll loosen up these nuts enough to where they slide right over these flashings.

  • So in this case, we're actually gonna mount this rail with the non-hardware side facing

  • down towards the ground so that you don't see any of that hardware if you're looking

  • up at the array.

  • So we're gonna spin it around, we're gonna line it up with those flashings and we're

  • gonna drop it right down over the top of these.

  • We're gonna keep it loose for now, just hand tight, until we get the other rail in place

  • to make sure that they actually line up.

  • We're gonna wanna measure from a common point on the roof, in this case the edge of the

  • roof, to make sure that these rails are flush.

  • In a lot of cases, you could actually cut the rails up on the roof, however I don't

  • suggest doing that just because of the metal shards that you'll have all over your rooftop

  • and because you could damage the panels if there already mounted on top of these rails.

  • So we're gonna go ahead and measure, and then we'll tighten everything down.

  • And then we'll hand-tighten as we go through, making sure that the elevation of the rail

  • is where you want it to be.

  • Now, some rooftops aren't completely flat, so because of that, IronRidge's flashings

  • do have an elevation adjustment so that you can make sure that rail itself does remain

  • flat and consistent through the whole array.

  • Now, there are gonna be torque specs on each one of these.

  • If you are using a torque wrench make sure that you are using a very high quality torque

  • wrench.

  • If you over-torque these bolts, they will break.

  • Alright, so now we have our basic rail installation in place.

  • Now's it time to actually dress these rails with the appropriate wire management and install

  • any microinverters or optimizers that we may have as part of the system.

  • First thing we're gonna do is install these end caps.

  • IronRidge provides these end caps for their rails to be sure that no bees or bugs or anything

  • gets inside of the rails and it's also a good way to make everything look pretty good.

  • So we're just gonna snap these in place.

  • This is assuming that your rails are cut to length, which like I said before, you should

  • have them cut to length before getting them up on the roof.

  • It's always good to double check because once you do cut, you can't go back.

  • Now that we have those end caps in place, we'll place some wire management clips on

  • the top rail or on the rail that's gonna be closest to where your wires are gonna be located

  • either for the PV modules themselves or for possible optimizers or microinverters that

  • could be part of the installation.

  • So typically you're gonna get three of these clips per module, and you'll want to just

  • slide them right on top of the rail, close to where they may be.

  • They're fully adjustable so once we get the solar panels up here and ready to install,

  • we'll adjust them accordingly to make sure they're in the correct place.

  • So one of the most important parts of getting the whole rail system prepared is making sure

  • we're properly grounded.

  • Now the IronRidge system makes this grounding method very simple by adding one ground bolt

  • to each solar array.

  • Now this one ground bolt attaches to your bare copper wire, goes down to your ground

  • rod that's already existing, and this one ground lug is actually gonna go through the

  • whole system because their whole rail system is integrated.

  • Which means each piece and part has little teeth on it that bonds everything together

  • to be sure you don't have to individually ground each PV module.

  • So this little guy right here, we're gonna go ahead and install on either rail, whatever's

  • closest to your grounding mechanism, that'd what we're gonna use.

  • In this case, we're gonna set it on top of the rail just for ease of installation and

  • so that you can see what we're actually doing.

  • Now on your individual installation, you may choose to actually hide this up underneath

  • the solar panel.

  • That's not a problem, as long as it's properly grounded, you'll be safe.

  • Part of dressing our rails is gonna be installing any microinverters or solar optimizers that

  • we may have as part of our installation.

  • These guys in this case, this is a SolarEdge power optimizer, which will come included

  • with all of our SolarEdge systems.

  • This will be attached on each solar panel and then attached to each other, then down

  • to the inverter to carry the DC current.

  • So what we're gonna do, is we're gonna try and center this right underneath where that

  • solar panel's gonna sit so that everything has easy access to plug into each other.

  • So again, we have a simple piece of hardware, just a T bolt with a nut, and again, same

  • grounding mechanism built into it with the little teeth that are gonna bond this unit

  • to the rail.

  • Now these are a T bolt so you will wanna make sure that they are positively seated inside

  • this channel, and that the T is turned completely.

  • You'll know that that T is turned correctly by the little hash mark in the top of that

  • bolt being opposite of the rail itself.

  • So in this case, we're going up and down with that little hash mark where our rail is going

  • side to side.

  • So in this case we have our optimizer put in place right where we're gonna want it underneath

  • that solar panel.

  • And we can use the wire management that we have in place to set the cables up underneath

  • here, and they clip, so they hold it.

  • Now we know that we're gonna do some adjusting with our wires, and in this case actually

  • not have an optimizer for our system, but I did wanna show you what all was entailed

  • with that installation and how you would appropriately use this wire management system.

  • What we have here is the UFO system by IronRidge.

  • This is a mid clamp which will actually be used throughout the whole system, and with

  • the addition of the stopper sleeve this will turn into an end clamp.

  • We'll just simply push the two pieces together, snap them together, and that now is an end

  • clamp that will hold the end of the panels in the array together.

  • Whereas the single piece by itself will separate the panels in the center.

  • Now we're gonna move onto the actual installation of the solar panel using the IronRidge UFO

  • clamps.

  • We'll have these end clamps on the end of the rail, we'll have the mid clamps between

  • the solar panels that we're actually installing.

  • I generally recommend that you have a few hands doing this at least.

  • You will be dealing with a 50 to 60 pound solar panel, and they're not very easy to

  • hold in place while you're bolting.

  • In this case, we've got a really lightweight solar panel for this project just to make

  • it really easy.

  • I'll go ahead and lay this solar panel down.

  • We're gonna make sure that we're going over the top of our wire management and in the

  • case that we do have an optimizer or a microinverter, we wanna make sure that we're not pinching

  • it in any way.

  • That this panel is sitting flush down on the rails with those mounting holes within two

  • to three inches again of the rail itself.

  • We're gonna take the mid clamp, the part that doesn't have the sleeve, we're actually gonna

  • set it up here.

  • This is gonna be between two solar panels and you're gonna end up having a number of

  • these if you have a longer array.

  • These'll sit in place okay, they're just a little T bolt on the end so again, they're

  • gonna go into the channel, turn, and lock in place.

  • The end clamp, again with that sleeve, is what's going on the end of the panel.

  • That sleeve makes sure that nothing tightens down too much that it won't be able to hold

  • this panel in place.

  • Once we have these up here, we are going to go ahead and tighten down our end clamps.

  • Not all the way, but just enough to assist in holding the panel.

  • And again, you do wanna make sure you have positive pressure on that T bolt to make sure

  • it doesn't spin within the channel.

  • Same thing on the bottom, and of course, now we wanna make sure again our measurements

  • are really similar with the rails from the edge of the roof so that it all lines up aesthetically.

  • Now we've completed the installation of our IronRidge roof mount racking system.

  • If you have any questions while going through this process, feel free to give us a call

  • or stop by our website at wholesalesolar.com.

  • My name's Jeremy Allen, I'll see you next time.

Hello, solar folks!

字幕與單字

單字即點即查 點擊單字可以查詢單字解釋

B1 中級 美國腔

將太陽能電池板安裝到屋頂的最佳方式是什麼? (What's the Best Way to Mount Solar Panels to My Roof?)

  • 31 3
    songwen8778 發佈於 2021 年 01 月 14 日
影片單字