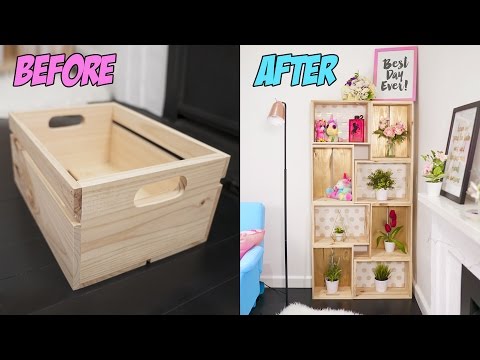
Placeholder Image

字幕列表 影片播放

  • Hey guys! It's Wengie. Welcome back.

  • And sunnies hug!

  • I don't know about you guys, but my room constantly gets messy.

  • I feel like I walk into the room and like this invisible tornado happens and I'm just like

  • "I cleaned it a couple days ago!" so today I thought I'd share with you guys

  • some super cool organizational DIYs and life hacks you can use to organize your home

  • or your room and up your decor game.

  • Hold up! If you guys aren't part of the fam yet here already, I encourage you guys to join.

  • Welcome! We're a super cool bunch here and all you need to do is click the

  • subscribe button down below and you'll be automatically entered into the

  • current MacBook Air giveaway and the second thing you need to do is be part

  • of my Vlog Squad, which means subscribed to my vlog channel, which I have linked down below.

  • Give this video a like and click the thumbs up and if we can get this to 150,000 thumbs

  • up, I would be so ecstatically happy.

  • I have a question for you guys. During this video, please pick your favorite DIY or hack

  • and let me know down below.

  • Also, I made this video in partnership with Quay Australia and they have some

  • super cool sunnies, which I'm going to show you during this video.

  • Without further ado, let's get on with the video. Let's go.

  • I seriously love my sunglasses, especially these ones from Quay Australia, and I

  • had a drawer, but they definitely deserve a display organizer, so let's make one.

  • All you need is a picture frame, some fairy lights or wire, and some pushpins.

  • The first step is to take out the back of the picture frame.

  • I bent the metal bits back with a butter knife and then removed the backing, including the glass.

  • Then flip your frame to the back and mark it out where you want your sunnies to hang

  • by using a pushpin on either side of the frame.

  • Leave a gap when you do this so the wire can slide underneath.

  • Now use your wire or fairy lights and twist it along the first pin.

  • Then trail it across, down, then across.

  • Make sure it's super tight or it will sag when you hang your sunglasses.

  • Finally, push your pushpins down once the wire is in place and it will hold firmly.

  • You can also use hot glue to glue this in place if you want to make sure it stays.

  • You sunglasses organizer is now complete!

  • Just hang all your favorite sunnies on the wire and they will look so amazing and it can

  • even double up as a cute decor item, especially with the fairy lights.

  • I love these sunnies from Quay Australia.

  • They have an amazing range, including their muse fade style and I'm going to be giving

  • away ten of these, so if you want a pair, check the description box on how to enter and good luck!

  • I've also included a link there to the awesomely sassy muse fade style, so be sure to check that one out, too.

  • If your wardrobe is starting to get a little bit cramped, you can use this quick hack

  • to make more use of your space.

  • Just take a chain and thread it through the first coat hanger.

  • This then allows you to thread multiple hangers on the one hanger which saves a ton

  • of space by spreading out your clothes vertically instead of all horizontally.

  • This is especially useful if you have a tall wardrobe like me.

  • I don't know about you, but I have this drawer where cables go to die.

  • I don't even know what's in there really, but we can organize this super easy so we do.

  • All you need is some toilet rolls and optional duct tape for decoration.

  • Simply create a pattern you like on the toilet roll using decorative duct tape or leave it plain.

  • It's up to you, but how cute is this unicorn one?

  • Once you've covered up the toilet roll, simply write down what the cable is for using a Sharpie.

  • Roll it up and then tuck it into the toilet roll.

  • That's it! Now when you put it into your drawer, you'll know exactly what each cable is

  • for and it won't be tangled and disorganized.

  • Seriously so satisfying.

  • This has got to be one of my favorite DIYs so far.

  • This used to be empty crates. Like what?

  • All you really need are eight crates for this DIY, which can be like old milk crates

  • or fruit crates or anything really.

  • You can decorate these with anything you like, but I used a combination of wrapping

  • paper and spray paint, so on four of the eight crates I used some painter's tape and scrap

  • paper to cover up all the sides, leaving the base exposed.

  • Then take your gold paint and spray away.

  • Try not to breathe in these fumes if you can avoid it because they're not very good for you.

  • Once the paint is dry, peel off your tape and feel free to take your time with this because it is so satisfying.

  • Once everything is removed, it looks pretty good.

  • Next I used some wrapping paper to decorate the remaining four crates.

  • Just fold it in to fit the bottom of the crate and then use some double sided tape to stick it onto the base.

  • The great thing about the wrapping paper method is that you can change up the

  • style of your shelves any time you want.

  • Now to assemble them like this.

  • This shelf will actually hold in place just fine, but you can also nail them in

  • place if you're putting heavier objects in them.

  • I'm so in love with how unique the different shapes of the shelves are and the gold

  • and the polka dot design is so cute.

  • This is such a amazing way to organize your books or display items and it's completely customizable.

  • Now we're going to create a custom whiteboard to do list that sits on your desk or hangs on a wall.

  • Grab a picture frame and open it up.

  • Remove the display image from the back and use it as a guide to cut out your own custom backing.

  • I had this super cute design left over from spray painting a DIY and it was so perfect for this.

  • Place the cardboard in and put it all back together.

  • And now it's ready. Just get any whiteboard marker and start writing your to do list.

  • And of course, once you've completed it, which feels really good by the way, just

  • wipe it away and you're ready to start over again.

  • It looks super cute on your study desk and you can save so much paper by using this instead.

  • This amazing DIY craft storage caddy helps you upcycle something you usually throw away.

  • That's right. It's actually used to store apple cider.

  • To make this, you'll need an empty drink caddy, some wrapping paper, and some paint.

  • Simply measure out the rough size of the wrapping paper you will need and cut that out first.

  • Then wrap up the drink caddy as neatly as possible, using some tape as you go.

  • You will need to cut the wrapping paper around the open side of the caddy in order to

  • fold it in over the edges and when you're ready, use some glue or sticky tape to stick it down.

  • Once you're done, simply paint any remaining visible cardboard.

  • I used this beautiful gold to match the rest of my decor items and that's it.

  • It's so cute and a great way to store your bits and pieces from your DIY projects.

  • If you're running out of space in your cleaning closet, simply use an over the

  • door shoe organizer on your closet door to store any additional cleaning products and supplies.

  • It's not only super tidy and frees up space, but you can also see everything you need super clearly.

  • Simply close the door and the mess is hidden away.

  • Super neat, right?

  • If you're an avid gift giver, this one's for you.

  • Simply get a garment bag to store all your loose wrapping paper.

  • If yours is too long like mine, you will need to measure out the length of your

  • wrapping paper for the garment bag to the length and secure it with some board clips

  • at the bottom and the edges.

  • Now unzip and put your wrapping paper in vertically.

  • How satisfying is it to watch them neatly pile in? Oh my gosh.

  • Once you're done, simply zip it up and hang it.

  • I keeps your wrapping paper clean and crease free and it hardly takes up any space.

  • - Wengie, can I borrow your phone charger?

  • - Okay, just a second.

  • If you get confused like me, this next DIY is for you.

  • All you need is some colored washi tape and Sharpies to make your plugs stand out.

  • I first used some of this mesmerizing glitter tape on the plug itself.

  • And then used some washi tape and folded it over on the cord.

  • Cut out a triangle at the end and then use a Sharpie to write what it is so

  • you'll always know what you're unplugging when you're under the table.

  • Genius, right?

  • Here's an easy way to make a super cute note board to hold all your loose paper

  • that's probably cluttering up your desk.

  • All you need is a picture frame, some chicken wire, pushpins, and pliers.

  • First remove the back part of your frame including the glass.

  • Then turn your frame to the back.

  • When handling chicken wire, you probably want to wear some gloves because the wire

  • often has loose sharp ends, so be careful.

  • Place a roughly cut sheet of chicken wire on top of your frame so that it's all covered.

  • Use the pushpins to pin the wire in place.

  • You want to do this all along the edges to hold it securely.

  • You can then use hot glue on top for extra security if you want.

  • Once that's done, simply trim the edge of the chicken wire with your pliers so there

  • is as little excess as possible to stick out and hurt you.

  • You want to make sure that no sharp bits cross over the edge of the frame.

  • When you're done, it should look like this.

  • Turn your frame around and it's ready to use.

  • Simply get some small, cute pegs and start pinning whatever you like to it.

  • You can use this to hold any important notes or cards or even decorate it with photos if

  • you like, but I have so much cute fan art and letters from you guys that it's honestly just

  • asking to be put on display, so this is what did with mine.

  • I think it looks super duper cute and mine is sitting nicely on my bedside table to

  • remind me of all the amazing memories I've been able to share with some of you.

  • It's just perfect.

  • So I hope you guys enjoyed these DIYs and hacks today.

  • If you guys do any of these, don't forget to share them with me on #Wengiecorns.

  • I love looking at all your creations.

  • Find me on social medias during the week or on Reacticorns.

  • *screaming*

  • I'm going to miss you guys so much. Time to say bye!

  • Love you!

Hey guys! It's Wengie. Welcome back.

字幕與單字

單字即點即查 點擊單字可以查詢單字解釋

B1 中級

10個DIY房間裝飾生活小竅門,為整理和春季清潔裝飾提供靈感! (10 DIY ROOM DECOR LIFE HACKS FOR ORGANIZATION & SPRING CLEANING DECORATING IDEAS!)

  • 102 6
    samko5sam 發佈於 2021 年 01 月 14 日
影片單字