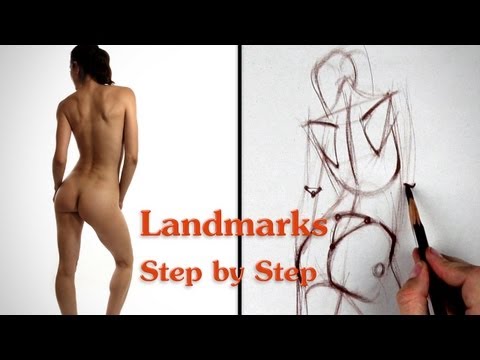
字幕列表 影片播放
Ok, so again I'll start with the angles of the shoulders. Just a straight line that connects
one corner to the other. Can't see the acromion because they are above our eye level, but
that's ok, it's still fairly easy to judge that angle.
From the shoulder, down to the waist where you see the pinch. To the other side where
it's stretching.
A few quick rhythm lines for the hips
Angle of the arms
And the legs. Getting that elegant S curve sweeping down the entire length of the leg.
Really common to see people making this too straight. Remember, in the gesture phase of
the drawing, you want to exaggerate a bit because once you start adding details it becomes
stiffer. So look for the motion between the forms and construct it with simple C curves,
S curves or straight lines.
Measuring the centerline of the spine and getting a general angle of the lumbar region.
And same thing in the thoracic region.
Finding the sweep of the trapezius. Starting from the neck down to the acromion.
And basic shape for the head.
So now I'm thinking about the pelvis as a cylinder and finding the cross contour line
to establish the perspective of hips. Also trying the make that curve pass through the
landmarks at the PSIS - the dimples in the back at the corners of the iliac crest. And
then connecting those dimples to the tailbone to form the triangle of the sacrum.
From the acromion follow the angles down the spine of the scapula. And connect it over
to the other side. Always relate the two sides of the body for symmetry.
Then find the angle of the medial border of the scapula. On the right side it's really
easy to see that bottom corner since it's poking out and you see that deep shadow.
Same thing on the other side, and again relating the two side.
Trying to find the border of the rib cage not including any of the muscles on top. On
the right side I see a corner at the bottom of the rib cage. The 10th rib pokes out and
stretches the external oblique
Also seeing the iliac crest poking out on the right side there. So, I really want to
emphasize these bony protrusions. It's going to add structure to the drawing and make her
feel solid.
Again there's those dimples of the PSIS. Just want to double check to make sure they relate
correctly to the iliac crest indication I just put down.
Start with a straight for the tendinous area, curve out for the muscular part to the bones
in the knee.. And down to the Lateral Malleolus.
A shape for the bottom plane of the foot. I'm ignoring the high heel and imagining what
that foot looks like.
The gluteus is relaxed on the right side, so I'll draw it relaxed transitioning to the
leg. The left side is compressing because the weight is on that leg, so I'll draw this
U shaped connection to the leg indicating tension.
Coming back to the left hip and leg, I want to better define these shapes. Looking a little
closer at the contours, the anatomy and redesigning the shapes there.
And in here you've got the Olecranon, or the elbow. And her elbow is bend a little so you're
starting to see a triangular relationship between the 3 bony points there.
On the other side, not bent as much, but a very subtle bend so bringing those closer
to a straight line.
You can see the 7th Cervical pretty clearly there. And actually can see the 1st thoracic
vertebra too..
Alright that's it! If you want to see how I take this drawing further by adding the
anatomy and 3 other landmarks examples check out proko.com/figure. Premium membership gets
you access to all the extended videos of the Figure Drawing Fundamentals series.
If you like this video, share the wealth. Tell your friends, post it on your favorite
social network. And click on this button here to subscribe to the Proko newsletter if you
want to be updated about new videos. buh bye!