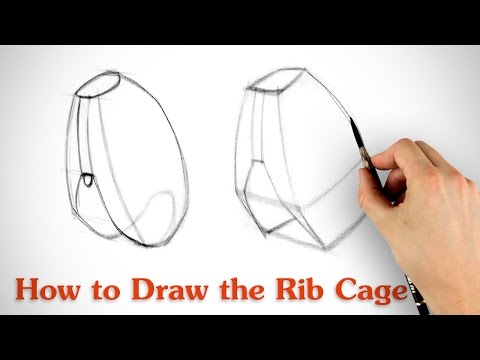
字幕列表 影片播放
In the last episode we learned the anatomy of the rib cage. If you haven’t seen that
one yet, make sure you don’t miss it.
In this episode, I’ll show you how to draw the forms of the rib cage step by step.
I always like to start my drawings with the biggest shapes first. In this case it will
be the egg-like shape. It’s thinner at the top where the neck attaches, and thickest
about ⅓ from the bottom. Try not to draw the entire shape with one stroke. Construct
the shape with many segments, analyzing the angle of each line as you go. Constructing
a shape from many angles like this allows you to visualize the shape and spend more
time making sure it’s the correct shape. Rather than doing it in one stroke hoping
your hand lands in the right spot.
You can see how with this shape I established the angle of the top plane, front plane, the
angle between the corners of the rib cage, and the curve of the bottom and back. I’m
being specific about each section of the shape while maintaining the tilt and the width to
height relationship of the overall shape.
The top plane of the rib cage tilts forward, so keep that in mind as you try to visualize
the planes.
Find the bottom of the sternum. Remember, it’s about half way between the pit of the
neck and the bottom of the rib cage.
The cartilage that defines the thoracic arch starts from the bottom of the sternum. So,
from there I’ll extend the thoracic arch shape, while considering the way perspective
would affect that shape.
I like to relate one side to the other and make sure that the angle of that line follows
the angle of the front plane as if this was a box. I’ll do a simplified version of the
rib cage after this to show you what I mean.
This side of the bottom plane is covered up, but I’ll ghost it in anyway so I can visualize
these forms better.
Indicate the edges of the sternum, curving over the front plane.
A little notch in here for the xiphoid process
And we need an indication for the edge between the front plane and side plane. This is like
the edge on the box.
Everything on the front or back plane will be at this angle, like a box in perspective.
Let me show you what I mean when I talk about the rib cage being a box.
We’ll think of the front of the rib cage as this flat plane that’s rotated slightly
to the left and downward.
The widest part of the rib cage is ⅓ from the bottom, so from there I’ll extend a
plane inward. Still part of the front plane just getting narrower.
From that, we can complete the box with a side plane and top plane.
So, we have the big simplified volume of the rib cage, and we can just draw the shape of
the thoracic arch right on it. Start by finding the bottom of the sternum and then some major
angles downward toward the corners.
And since the thoracic arch is an opening, we can see the bottom edge on the far side.
It will be parallel to the other bottom edge.
Let’s clean up this back side.
Ok, so that’s the front of the rib cage. The major structure from the back is very
similar, but the wedge shape at the spine is a bit tricky, so I want to show you how
to do that.
Start the major shape in the same way I do for the front. Constructing that shape in
parts.
For this bottom edge of the back plane, I’m observing the angle here on his back and trying
to imagine what it would look like of it was a box. And then it transitions to the angle
of the side plane.
Find the edge between the side plane and back plane. At this point it should look like a
simple 3 dimensional form. Notice that even though he is leaning back and toward us a
bit, we’re not seeing the top plane of the rib cage. That’s because the top plane tilts
forward, so in most back poses the top plane will be hidden behind the back plane.
The 12th rib actually connects to the spine up here and then angles downward. So, I like
to define that edge. It’s the same edge that we ghosted in from the front view in
the previous drawing. It’s a continuation of the thoracic arch as it curves around the
bottom corner of the ribcage and comes back up to connect to the spine.
Ok, this is the part that I wanted to go over. Remember in the previous video I mentioned
that the back plane has a concave wedge that holds the spine. To cut this wedge shape out,
we can think of 3 planes. One center plane, and 2 side planes. The center plane just follows
the curvature of the thoracic vertebrae.
I want to point out that this S curve is highly exaggerated by the trapezius muscles. The
spine will curve a little bit, but the curve we’re seeing here is the muscle pushing
in past the center line.
Thoracic spine rotation does affect the rib cage, but not nearly as much as this pose
might suggest. Ok, let’s get back to that wedge.
On each side of this center plane, we’ll have a inward facing side plane.
This might just look like 4 vertical lines to you, but try to imagine the cross contour
of this surface. This plane angles like this. And this plane angles like this. This is part
of the back plane. And this is also part of the back plane.
If a trail of ants marched across this surface, that ant trail would be the cross contour
line. Around the side plane, across the back plane, down the wall of the wedge, across
the center, then back up the other wall of the wedge, and across the rest of the back
plane.
Keep practicing drawing the forms until you have them memorized. If you’re struggling
with perspective, go back and rewatch my video on structure. Practice drawing boxes in perspective.
Once you can easily draw a box, then you can start making that box more complicated by
cutting out wedges.
I hope you guys enjoyed this lesson! If you want to see more drawing examples go to proko.com/anatomy.
I have 8 more examples, which serve as the answers to the assignment from the last lesson.
You’ll also find 3d models of the rib cage and the simplified rib cage, that you can
rotate and draw from any angle. proko.com/anatomy
If you’d like to win a free membership to the premium anatomy course, go to facebook.com/prokotv
and share the post for this video. I’ll choose a random winner next Friday. Good luck!
If you like this video, share it with your friends, and if you want to be updated about
new videos click here to subscribe to the Proko newsletter. Buh Bye!