
adorable
US /əˈdɔrəbəl,əˈdor-/
UK /əˈdɔ:rəbl/
- adj.值得崇拜的
B2 中高級更多air out
US
UK
- phr. v.通風
A2 初級更多as for
US /æz fɔr/
UK /æz fɔ:/
- prep.至於
- phr.關於
A1 初級更多as soon as
US /æz sun æz/
UK /æz su:n æz/
- phr.盡快;盡快
- conj.一旦...就...
A1 初級更多balloon
US /bəˈlun/
UK /bəˈlu:n/
- n. (c.)乘氣球;熱氣球
- v.t./i.像氣球般鼓起;乘氣球上升;乘氣球飛行;迅速增加
- v.t.使膨脹
- n.氣球狀的
B1 中級初級英檢更多bead
US /bid/
UK /bi:d/
- n. (c./u.)念珠;珠子
B2 中高級中級英檢更多butterfly
US /ˈbʌtɚˌflaɪ/
UK /'bʌtəflaɪ/
- n. (c.)蝴蝶;蝶式游泳;緊張
- v.t.將…切開攤平
B1 中級更多button
US /ˈbʌtn/
UK /'bʌtn/
- n. (c./u.)鈕扣;釦子;按鍵;按鈕;按鈕 (電腦);花蕾;鈕扣狀物
- v.t.扣上;扣住;壓抑
- v.i.住口
A2 初級多益更多candle
US /ˈkændl/
UK /ˈkændl/
- n. (c.)蠟燭
A2 初級初級英檢更多caption
US /ˈkæpʃən/
UK /ˈkæpʃn/
- n.標題 ; 說明
- v.t.字幕
B2 中高級中級英檢更多cardboard
US /ˈkɑ:rdbɔ:rd/
UK /ˈkɑ:dbɔ:d/
- n. (u.)硬紙板
B1 中級高級英檢更多care for
US /kɛr fɔr/
UK /kɛə fɔ:/
- phr. v.關心;照顧;喜歡
A1 初級更多cut away
US /kʌt əˈwe/
UK /kʌt əˈwei/
- phr. v.突然停止
A1 初級更多cut out
US /kʌt aʊt/
UK /kʌt aut/
- phr. v.離開;刪去;停止做...;剪掉;離開;閃人;停止運作
- v.t./i.停止做某事;不適合
- v.t.剪掉
- v.i.(引擎)熄火
- adj.適合
A1 初級更多cute
US /kjut/
UK /kju:t/
- adj.可愛的
B2 中高級初級英檢更多decide
US /dɪˈsaɪd/
UK /dɪ'saɪd/
- v.t./i.下決定;決斷;(法律的)決定,判決;導致,決定了(事情的結果)
A2 初級多益初級英檢更多decorate
US /ˈdɛkəˌret/
UK /ˈdekəreɪt/
- v.t.裝飾;裝璜;裝飾
A2 初級初級英檢更多depending on
US
UK
- phr. v.受撫養;取決於
- prep.視…而定;依靠
- ger.依靠
- v.t./i.依賴;取決於
A2 初級更多dimension
US /dɪˈmɛnʃən, daɪ-/
UK /daɪˈmenʃn/
- n. (c./u.)空間的;維(構成空間的因素);尺寸;尺寸;方面;維度;維度(電腦)
B1 中級高級英檢更多draw on
US /drɔ ɑn/
UK /drɔ: ɔn/
- phr. v.來臨;利用
A1 初級更多finish off
US /ˈfɪnɪʃ ɔf/
UK /ˈfiniʃ ɔf/
- phr. v.完成;擊敗;吃完
A2 初級更多fold
US /fold/
UK /fəʊld/
- v.t.折疊;關比;倒閉;抱胸;可摺疊;擁抱;拌入
- n. (c.)羊圈;信仰團體;摺疊處
- v.i.倒閉
B1 中級多益中級英檢更多for example
US
UK
- phr.例如
for sure
US /fɔr ʃʊr/
UK /fɔ: ʃuə/
- adv.當然;肯定地
- interj.沒錯
- phr.肯定地;毫無疑問地
A2 初級更多frame
US /frem/
UK /freɪm/
- v.t.陷害;謹慎表述;裝進相框;建造框架;環繞
- n. (c./u.)框架;骨架;主架構;心境;幀
A2 初級多益中級英檢更多glue
US /ɡlu/
UK /ɡlu:/
- n. (c./u.)膠水
- v.t.膠
B1 中級初級英檢更多greet
US /ɡrit/
UK /gri:t/
- v.t.問候;親切招待
B1 中級初級英檢更多have to
US /hæv tu/
UK /ˈhæv tə/
- aux. v.不得不
A1 初級更多in a minute
US
UK
- phr.馬上;在一分鐘內
A1 初級更多in half
US /ɪn hæf/
UK /in hɑ:f/
- adv.分成兩半;部分地
A1 初級更多in the dark
US /ɪn ði dɑrk/
UK /in ðə dɑ:k/
- adj.不知情的
- phr.在黑暗中;在黑暗裡
A1 初級更多in the end
US /ɪn ði ɛnd/
UK /in ðə end/
- phr.最後;歸根結底
A1 初級更多instead of
US /ɪnˈstɛd ʌv/
UK /inˈsted ɔv/
- prep.代替
- adv.寧願
A1 初級更多kick off
US /kɪk ɔf/
UK /kik ɔf/
- v.t./i.(足球賽)開始;開始(活動或運動);(非正式)去世;踢掉(鞋子)
- phr. v.開始;踢掉;(非正式)去世;足球開球;爭吵;勃然大怒
- n.開球
A1 初級更多lastly
US /ˈlæstli/
UK /ˈlɑ:stli/
- adv.最後
A2 初級更多light up
US /laɪt ʌp/
UK /lait ʌp/
- phr. v.照亮;點燃(香菸);容光煥發;興奮
A1 初級更多lollipop
US /ˈlɑliˌpɑp/
UK /ˈlɔli:ˌpɔp/
- n. (c.)棒棒糖;水果硬糖;交通指揮棒;圓頭麥克風
B2 中高級高級英檢更多make for
US /mek fɔr/
UK /meik fɔ:/
- phr. v.前往;導致
A1 初級更多napkin
US /ˈnæpkɪn/
UK /ˈnæpkɪn/
- n. (c.)餐巾;似餐巾之物;小毛巾;尿布
B2 中高級初級英檢更多next to
US /nɛkst tu/
UK /nekst tu:/
- prep.旁邊的;與...相比
- adv.幾乎
A1 初級更多occasion
US /əˈkeʒən/
UK /ə'keɪʒn/
- n.場合;時機;機會;理由;原因
- v.t.引起
A2 初級多益中級英檢更多of course
US /ʌv kɔː(r)s/
UK /ɔv kɔː(r)s/
- adv.當然
- phr.確信的
- interj.當然
A2 初級更多or simply
US
UK
- phr.或者簡單地說
A1 初級更多out there
US /aʊt ðɛr/
UK /aut ðɛə/
- adv.在那裡;存在於宇宙中;在世界上(尤指危險或困難時)
- adj.非傳統的;奇怪的;前衛的;存在的
A1 初級更多outline
US /ˈaʊtˌlaɪn/
UK /ˈaʊtlaɪn/
- n. (c./u.)描畫輪廓;大綱
- v.t.大綱;概述
A2 初級中級英檢更多outside the box
US
UK
- phr.跳脫框架
- adj.創新的
A1 初級更多pair
US /per/
UK /peə(r)/
- n. (c.)一對;一雙;一對;一雙
- v.t.將(人或物)兩兩配對
A2 初級多益初級英檢更多pink
US /pɪŋk/
UK /pɪŋk/
- adj.粉紅
A2 初級初級英檢更多pipe
US /paɪp/
UK /paɪp/
- v.i.用尖嗓子說;尖聲唱
- v.t.吹奏管樂;用管道運輸
- n. (c./u.)煙斗;管子
A2 初級多益初級英檢更多rectangle
US /ˈrɛkˌtæŋɡəl/
UK /ˈrektæŋgl/
- n.長方形:矩形
B1 中級多益初級英檢更多reflect on
US /rɪˈflɛkt ɑn/
UK /riˈflekt ɔn/
- phr. v.反思
B2 中高級更多scissor
US /ˈsɪzɚ/
UK /'sɪzə/
- v.t.剪去; 剪刀
B1 中級更多shell
US /ʃɛl/
UK /ʃel/
- n. (c./u.)殼 ; 貝;彈殼
- v.t.去殼;砲轟;射擊
B1 中級中級英檢更多side with
US /saɪd wɪð/
UK /said wið/
- phr. v.站在...一邊
A2 初級更多sketch
US /skɛtʃ/
UK /sketʃ/
- n.概略;概要;素描:描寫;幽默短劇;滑稽小品
- v.t.草擬;速寫;素描
B1 中級中級英檢更多snowflake
US /ˈsnoʊfleɪk/
UK /ˈsnəʊfleɪk/
- n. (c.)雪花
C2 高級更多stand for
US /stænd fɔr/
UK /stænd fɔ:/
- phr. v.支持;象徵;代表;忍受
A1 初級更多start off
US /stɑrt ɔf/
UK /stɑ:t ɔf/
- phr. v.開始;出發
B2 中高級更多stencil
US /ˈstɛnsəl/
UK /'stensl/
- n.模版
- v.t.用模板印刷
C1 高級更多stick
US /stɪk/
UK /stɪk/
- v.t./i.棒;黏貼,張貼;堅持;伸出;忍受
- n. (c.)棍棒,棍枝,枝條
A2 初級初級英檢更多stick on
US /stɪk ɑn/
UK /stik ɔn/
- phr. v.黏上;堅持下去
B1 中級更多stone
US /stoʊn/
UK /stəʊn/
- n. (c./u.)石 : 石頭
- v.t.向...投擲石塊;用石頭砸
A2 初級初級英檢更多strap
US /stræp/
UK /stræp/
- n.捆綁:約束
B1 中級多益高級英檢更多take a piece
US
UK
- phr.拿一塊
- idiom分一杯羹
A1 初級更多tape
US /tep/
UK /teɪp/
- v.t.記錄;用膠布把...黏
- n. (c./u.)(錄音或錄影)磁帶;膠帶
A2 初級初級英檢更多texture
US /ˈtɛkstʃɚ/
UK /ˈtekstʃə(r)/
- n. (c./u.)(文藝作品等的)組織;結構;紋理:質感:質地
- v.t.使...具有粗糙或浮凸的紋理
B1 中級高級英檢更多thread
US /θrɛd/
UK /θred/
- n.帶螺紋的;(用來縫製衣物的)線;思路;線程
- v.t.通過;穿過;穿(針;線等);旋上螺紋
B1 中級多益中級英檢更多to let
US /tu lɛt/
UK /tu let/
- prep.出租中(房屋)
A2 初級更多triangle
US /ˈtraɪˌæŋɡəl/
UK /ˈtraɪæŋgl/
- n.三角戀;三角鐵;三角形
B1 中級多益初級英檢更多two halves
US
UK
- phr.兩個一半
A1 初級更多wait for
US /wet fɔr/
UK /weit fɔ:/
- phr. v.等候
A1 初級更多whale
US /hwel, wel/
UK /weɪl/
- v.t.毆打;打;捕鯨;獵鯨
- n. (c.)鯨
B1 中級初級英檢更多write down
US /raɪt daʊn/
UK /rait daun/
- phr. v.寫下
A1 初級更多
Vocabulary
- in half: 分成兩半
- have to: 不得不
- stick on: 黏上
- instead of: 代替
- light up: 照亮
- finish off: 完成
- depending on: 受撫養
- cut out: 離開
- make for: 前往
- care for: 關心
- wait for: 等候
- to let: 出租中(房屋)
- kick off: (足球賽)開始
- of course: 當然
- draw on: 來臨
- air out: 通風
- start off: 開始
- for sure: 當然
- in the dark: 不知情的
- side with: 站在...一邊
- stand for: 支持
- next to: 旁邊的
- take a piece: 拿一塊
- as for: 至於
- as soon as: 盡快
- cut away: 突然停止
- for example: 例如
- or simply: 或者簡單地說
- in a minute: 馬上
- out there: 在那裡
- in the end: 最後
- write down: 寫下
- two halves: 兩個一半
- outside the box: 跳脫框架
- reflect on: 反思
- card: 連續卡片 ; 牌
- paper: 文章
- birthday: 生日 ; 起源 ; 誕 ; 誕辰
- black: 黑色鞋油 ; 黑色塗料
- pair: 一對;一雙
- write: 寫;書寫
- draw: 吸引注意
- white: 懷特 (英文名)
- green: 青草綠的
- make: 提供
- eye: 眼睛
- friend: 朋友;夥伴
- color: 改變某人的想法
- yellow: 黃色的
- love: <名字>
- glue: 膠水
- cut: 縮減大小、數量
- piece: 籌碼
- balloon: 乘氣球
- decide: 下決定;決斷
- perfect: 完美的;無可挑剔的
- cloud: 使迷糊
- idea: 點子;想法;理念
- bit: (馬)嚼口;馬勒
- add: 加上
- side: 側線 ; 旁軌 ; 外牆
- pink: 粉紅
- usual: 普通的;通常的
- lovely: 可愛的;迷人的
- top: 達到
- candle: 蠟燭
- fold: 折疊
- stick: 棒
- whale: 毆打;打
- butterfly: 蝴蝶
- button: 鈕扣;釦子
- decorate: 裝飾;裝璜
- greet: 問候;親切招待
- pipe: 用尖嗓子說;尖聲唱
- occasion: 場合
- frame: 陷害
- stone: 石 : 石頭
- smile: 露出(微笑)
- season: 季節
- shape: 外形;形狀
- cardboard: 硬紙板
- rectangle: 長方形:矩形
- cute: 可愛的
- shell: 殼 ; 貝
- triangle: 三角戀
- outline: 描畫輪廓
- lastly: 最後
- dimension: 空間的
- texture: (文藝作品等的)組織;結構
- sketch: 概略;概要
- thread: 帶螺紋的
- strap: 捆綁:約束
- tape: 記錄
- minion: 爪牙;手下;寵兒;寵物;奴隸;鉛字的一種
- adorable: 值得崇拜的
- bead: 念珠;珠子
- stencil: 模版
- snowflake: 雪花
- napkin: 餐巾;似餐巾之物;小毛巾;尿布
- lollipop: 棒棒糖;水果硬糖
- caption: 標題 ; 說明
- scissor: 剪去; 剪刀
在 App 中使用完整體驗
隨時隨地學習,完整解析句子與用法
01:03
She took a brave step forward, leaving behind her comfort zone to chase her dreams.
單字片語
- brave
adj. 有勇氣的
- comfort zone
phr. 舒適圈
本句說明
a brave step 是名詞片語,其中 brave 是形容詞,修飾名詞 step,表示「勇敢的一步」。
forward 是副詞,修飾 step,表示「向前」。
整個片語作為受詞,回答 took(動詞) 的「什麼」——她邁出了勇敢的一步向前。
在 App 中使用完整體驗
隨時隨地查單字,掌握發音、詞性與用法
brave
US/brev/
UK/breɪv/
adj.勇敢的
v.t.勇敢地面對
A2 初級
在 App 中使用完整體驗
隨時隨地練習口說,立即獲得發音回饋
Try this speaking exercise.
試著跟著這句話練習。
80
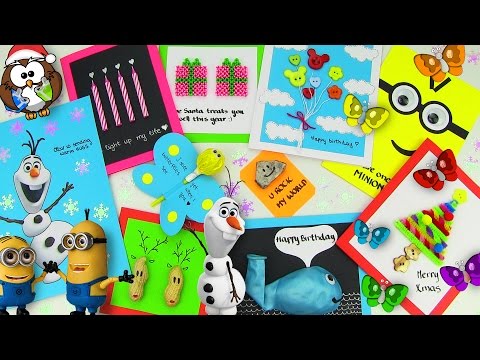
DIY 手作禮物!10 個超簡單卡片教學!(聖誕、生日、情人節手工卡片靈感) (DIY Gifts! 10 Easy DIY Card Ideas (DIY Cards with Christmas Gifts, Birthday & Valentine's Day))
0
Wenny 發佈於 2021 年 01 月 14 日想親手製作獨一無二的生日、情人節或任何節日卡片嗎?這部影片有 10 個超簡單的 DIY 卡片點子,教你利用回收材料,還能學到超有趣的英文手作單字!在動手做出驚喜手作禮物的同時,你也能學到實用句型和簡單的句子結構喔。
在 APP 上學習此影片!
在 VoiceTube App 中有針對影片更深入的練習方式唷!