Placeholder Image

字幕列表 影片播放

  • Hello and welcome to Cupcake Addiction's Ombre Layered Push Pop Tutorial where I'll be showing

  • you how to make this gorgeous layered Ombre push pop or cake shooter.

  • Tools and equipment that we will be using today:

  • I always like to rest mine in a polystyrene block.

  • I've got my push pop containers. Now this can be bought... I usually get mine from eBay.

  • You shouldn't pay more than about 60 cents to a dollar for one of these. 60 cents or

  • 50 cents is about what I pay for them. And these can be used either with stick or you

  • could pull the stick out, use it without the stick and just sit them straight on the table

  • if you don't have a push pop stand or container. I've got 4 ombred cupcakes. So I've used just

  • a standard vanilla mix. You can either use your favorite mix or you can use a store-bought

  • packet. And I've colored mine in 4 different shades of pink.

  • Now to do this, I evenly divided my vanilla cake mix or my white cake mix into 4 different

  • bowls. And I added first of all the lightest color, just a couple of drops of pink food

  • coloring and then I doubled the amount for each color thereafter. So I added, I think,

  • about 3 drops to the first color, 6 to the second, about 12 or so to the third and so

  • on until I end up with my really dark color. So the thing with ombre you want to remember

  • is there's a really slight color difference between the layers, not a drastic color difference.

  • So just make sure that your first one is very light, your last one is very dark, and the

  • other two are slightly spaced in the middle. I've got some white sprinkles. Now these are

  • really optional. I have to choose them for a bit of texture on the top of that push pop.

  • Once that I've gone with just white nonpareils. I've got some of our perfectly pipeable buttercream

  • frosting in vanilla or just plain white. I've got some of mine in a zip lock bag which

  • I've prefilled and I've just cut a decent-sized little tip out of the end.

  • And I've got a little bit more of it in a disposable piping bag with a star tip, so

  • any sized star tip but it's just going to give us our lovely little swirl on top.

  • I've got a serrated edge knife. I've got a little circular cookie cutter.

  • Now for the circle cookie cutter, I've used the size that is almost exactly the same size

  • or just a touch bigger than that push pop. I always like to cut mine in a circle shape

  • first and then pop them into the push pop which just gives me a neater finish.

  • And I've got one of our premade fondant butterflies. Once again, purely optional, that's just to

  • add a little bit more detail. We've got a whole tutorial on these butterflies on our

  • channel My Cupcake Addiction. So we'll make sure to leave a link to that in the description

  • box below. Now the first thing that we're going to do

  • here is we're going to trim off the tops and bottoms of our cupcakes and take them out

  • of the wrappers. So you just want to unwrap all four and then you want to take your serrated

  • edge knife and you're just going to trim the top and trim the bottom just as little as

  • you possibly can get away with just to trim off any brown that sits on there.

  • So you can see there, once we've cut away our tops and bottoms, the color of the cupcake

  • is really quite apparent. Pop your off cuts into separate bowls if you'd like to use those

  • for some ombre layered cakepops at some point. And what we want to do here is you just now

  • want to cut each cupcake in half. So for each 4 cupcakes, you're going to get 2 cakepops.

  • If you want to do a dozen of these push pops, you're going to need 24 cupcakes. There is

  • a bit of wastage so you will have plenty leftover to make some beautiful ombre or just plain

  • pink cakepops. Now from here, you want to take your cookie

  • cutter. So we'll get rid of the top because I'm actually going to make one push pop today.

  • Take your cookie cutter and just make a lovely circle out of each of those cupcake bases

  • or cupcake bottoms. And you can see there, by using the circle cutter, what I'm getting

  • is a really nice, neat, even finish around the sides. That's just a fraction bigger,

  • so pretty well the same size as the room of our push pop container. But it's going to

  • give it a really nice flash fit against the sides but it's still giving us a really nice

  • neat finish. So I'm going to have a little bit of a tidy

  • up and then we can come back and get decorating. Alright, so we want to take the bottom piece

  • or the darkest color. I like to turn it upside down just in case you've been a little bit

  • messy with the trimming there and just take that push pop container, push it right down.

  • What you get there is just a tiny, tiny, little bit of offcut and a really nice neat finish

  • on that push pop container. So just gently with your fingers, just push it down and you'll

  • see there that I'm actually turning the push pop container and that's just to make sure

  • that I don't break the cake and that it all goes down nice and evenly. It doesn't turn

  • on to its side or anything. So you want to make sure it's all the way down in that nice

  • little cup at the bottom there or the base. And then it's time for a little bit of frosting.

  • So taking that zip lock bag with some of that frosting... What you want to do here is you

  • want to push it right down unto that frosting, unto that cake layer so that it sticks. So

  • you can see there, I'm pushing my bag in and I'm actually going to apply quite a lot of

  • pressure. And just on goes a blob. Once that blob has gone on, I'm just going to use my

  • zip lock bag. And you can see there, I've just really pushed

  • it down unto that frosting. That's because we're going to turn these next piece upside

  • down. Turn your push pop container upside down and if that frosting is not stuck, the

  • whole blob of it is just going to fall off. It's not going to be too much of an issue

  • but you're just going to have to reapply it. Turn it upside down and the same thing -- so

  • just pushing it down unto that next color and push down your next color.

  • If you love this tutorial, make sure that you head on over to our channel My Cupcake

  • Addiction. Hit the Subscribe button. We upload 3 times a week and we would absolutely love

  • to have you stop by. As I push that down, you can see there, I'm

  • pushing around the sides and that beautiful little white layer divider of frosting is

  • just becoming ever so slightly apparent. So you don't want too much frosting because you

  • really want the cake to be the hero of these push pops.

  • So we're going to repeat that process. A little bit more frosting, pushing down nice and firmly

  • unto that layered cupcake and then just, just... I'm not even squeezing now. I'm just using

  • the tip of the bag just to really connect to that frosting to that second layer of cake.

  • Turn your next piece upside down, upside down with the push pop, and down she goes. Pushing

  • down, out comes our lovely little layer of frosting, and it's time for our last layer.

  • Now depending on what you want to do with your push pops here. If you want their lids

  • on, leave that last layer as it is. It's going to come ever so slightly out the top of your

  • push pop container. And when you pop that lid on, it's going to fill it absolutely perfectly.

  • So what you'll have there is... Stick it sort of on top. What you'll have there is you'll

  • have... See there the push pop coming into the lid.

  • If you want to do like I've done, leave the lid off, put a lovely little swirl on top,

  • a little bit of detail like a butterfly. You just want to cut a little bit off this top

  • section so that it's not quite so tall because you don't really want it coming over the top

  • of your push pop. So what we'll do is we'll frost first and we'll stick it in and then

  • we'll just trim the push pop off. So a little bit more frosting and on to our

  • -- I should turn it over -- on to our last color, pushing it down like so. And then I

  • just want to take the knife and I'm just going to just trim perfectly flash along the top

  • there. So you can see you've got now a really nice and neat finish to your push pop.

  • Now if you're going to go with my style, you want to take your piping bag and we're just

  • going to do one of our sundae-style swirls but in a smaller version because it's just

  • on a push pop. We've got a whole tutorial dedicated to how to perfect that cupcake-y

  • style of swirl on our channel so I'll leave a link to that in the description box below.

  • I opted to add a few sprinkles. It just gave it a little bit of texture, so like I said,

  • just some white, you could use some pink, some of our do-it-yourself edible sanding

  • sugar perhaps, anything you like. Now before you add your butterfly, turn your

  • push pop around because it's always going to have a best side. You can see there, this

  • side here, it still looks nice but we're missing a little bit of frosting in just a couple

  • of those sections. So turn it around so you've got your best side forward. For me, I think

  • that's right there. Take your little fondant butterfly. These one of butterflies, I've

  • made a couple of days in advance so they're really firm, really hard and really dry, and

  • they're not going to sag. They're going to stay beautiful and upright on top of our push

  • pop, and just sit it on top. So there you've got your completed ombre layer

  • push pop or cake shooter, perfect for any occasion. I hope that you've enjoyed watching

  • this tutorial as much as I've enjoyed making it for you. As always, thank you very much

  • for watching My Cupcake Addiction.

Hello and welcome to Cupcake Addiction's Ombre Layered Push Pop Tutorial where I'll be showing

字幕與單字

單字即點即查 點擊單字可以查詢單字解釋

B1 中級

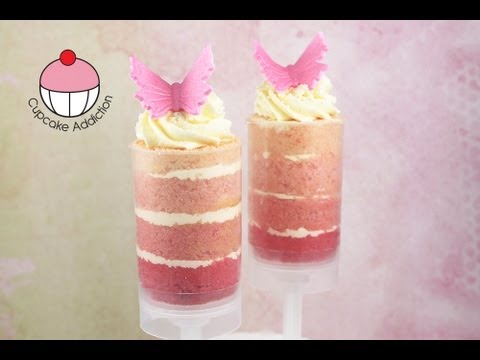
美麗的Ombre Push Pops! (Beautiful Ombre Push Pops! Make Layered Cake Shooters - A Cupcake Addiction How To Tutorial)

  • 61 6
    cathy~ 發佈於 2021 年 01 月 14 日
影片單字